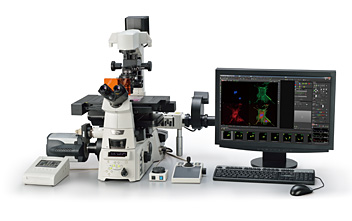
Nikon Ti-E Inverted Microscope with Double Port FRET System

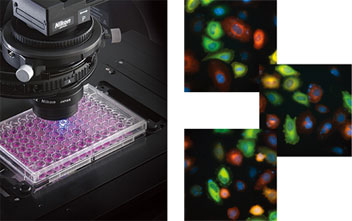
The MCB Microscope Facility houses a Nikon Ti-E inverted microscope with Z-stacking capability, and a motorized stage and CO2 incubator for live imaging of cells and FRET analysis. The Nikon Ti-E microscope is equipped with a colour CCD camera to capture bright field, phase contrast and fluorescent images from 4X to 100X magnification from live cells, as well as fixed samples. The microscope is also equipped with two, low light, cooled EMCCD (Electron Multiplying Charge Coupled Device) monochrome cameras for simultaneous detection of FRET signals. Phase contrast and Normarski DIC optics facilitate the acquisition of high contrast and high resolution images at low magnifications. Narrow band filter blocks allow fluorescent imaging in the UV, FITC and Texas Red range.
The microscope is linked to NIS-Elements AR imaging software which will allow image acquisition up to 6D (X, Y, Z, time, Lambda (wavelength), multipoint), archiving and analysis. This is particularly important for live cell imaging where information from all 6D are organized within one integral platform. Furthermore, the NIS-elements analysis software includes the capabilities for object counting, automated measurements, region of intent measurements and time measurements including image ratio ing of multi-channel images. The NIS Element software can also be used to stitch large images together seamlessly. Most importantly the NIS-Elements software has a built in image-database for the archiving of all image and meta-data captured on the microscope.
All images captured on the microscope will be stored on a dedicated 10 TB server (ROSALIND) managed by ICTS at UCT, from which users can download their images via the internet. All data stored on this dedicated server will be automatically backed up for 6 weeks from date of aquisition. The open source OMERO software will be used for users to view and manage their image data on the ROSALIND Data Store. This solution will be integrated into the University of Cape Town's long term data management strategy.
All sessions on the MCB Inverted Fluorescent microscope should be reserved using Microsoft Teams. Initial training must be undertaken if the user is unfamiliar with the Nikon Ti-E fluorescent microscope.
Contact Keren Cooper (keren.cooper@uct.ac.za) to arrange a training session. Once you have been trained, you will be sent an invitation to join the MCB Fluorescent Microscope Team.

NON-COMMERCIAL USERS
Brightfield microscopy only
R40 per hour (unassisted) | R190 per hour (with technical assistance)
Administration fee (per invoice): R50
Fluorescence microscopy
R80 per hour (unassisted) | R230 per hour (with technical assistance)
Administration fee (per invoice): R50
COMMERCIAL USERS
Brightfield microscopy only
150 per hour (unassisted) | R850 per hour (assisted)
Fluorescence microscopy
R300 per hour (unassisted) | R1000 per hour (assisted)
Administration fee (per invoice): R200
1. Microscope Use
You will need to pass a competency test before you can be accredited to work on the microscope independently. Arrange a time with Keren Cooper to demonstrate your ability to carry out the following instructions:
1.1. Switching on and off
a) Switch on the microscope and the lamps, and understand the function of each component.
b) Do not switch on the Intensilight (the Hg Lamp) within one hour of it being switched off (if you book a session directly after another user, please contact them to request that they leave the Intensilight on).
c) Make sure to switch everything off at the end of your session (unless contacted by another user to leave the Intensilight on).
1.2. Precautions when using oil
a) Add immersion oil to the 60X or 100X objectives (i.e., not to your slide).
b) Clean immersion oil from the lens using lens cleaning tissue (use lens cleaning tissue wrapped around an earbud - do not use the earbud with ethanol).
c) If you view your slide with the 40X objective subsequent to adding oil to the 60 or 100X objectives, please check that excess oil from your slide has not transferred to the 40X objective and clean if necessary. If in doubt, clean!
1.3. Use of slides and coverslips
a) Load the slide onto the stage correctly.
b) Slides should be clean and free from excess mounting fluid.
c) Only clear varnish should be used. No glitter polish will be allowed.
d) Varnish must be dry before use.
1.4. Disposal and removal of samples
Users must remove and dispose of all their samples in their own Labs. No disposal methods (waste bins or bottles etc.) will be provided.
You will be given access to the MCB Fluorescent Microscope Facility (4.32.1) and the Rosalind Server once you have passed your competency test and have been accredited as a MCB Fluorescent Microscope User.
3.1. Instructions on saving your microscope images on the Rosalind Server
A data share, called Rosalind, is available for you to save your microscope images remotely. You will be able to access Rosalind from your own computer as well. Part of your payment for the use of the microscope includes the safe storage of all your images for 6 weeks. Your data will be backed up during this period. It is your responsibility to find a solution for the storage of your images beyond this 6 week period.
Mapping a drive to the Rosalind data share
You must be logged into the UCT network in order to map the network drive to MCB Central Data share. If you are off-campus, you will also need to be logged into the UCT VPN.
Windows
1. Open Select "This PC" in the file explorer (or right click it)
2. Select "Map network drive" from the taskbar (or the right click dropdown list)
3. Next select a drive letter, e.g. O:
4. Type in the following path into the "Folder" field: \\researchdata2.uct.ac.za\MCB
5. Check "Reconnect at logon" to automatically remap your drive when you logon
Linux
Use the following command to mount the CIFS share
Command Line:
Example:
user@host:~$ mount.cifs
–o username=wf 3456,password=password,rw,nounix,iocharset=utf8,file_mode=0777,
dir_mode=0777 //researchdata.uct.ac.za2/MCB /mnt/MCB
The network drive will appear in your left hand side screen
Right click on ROSALIND, and you will be able to map the network drive so that you can always see it when you log onto your computer. You can assign a letter for the network drive.
Contact
For enquiries, please contact Keren Cooper (keren.cooper@uct.ac.za).
